


Documentation
Android Signing Key
Before you can publish your app to the Google Play Store, you need to sign it with a private key. This is a one-time setup that the Setup Page walks you through — you don't need to know any technical commands by heart, and you never type your passwords into the browser.
What is a signing key?
A signing key (also called a keystore) is a small file that acts like a digital signature for your app. Every version of your app that you upload to Google Play is signed with this file, and Google uses it to prove that all the updates really come from you.
⚠️ Very important — do not lose this file
If you lose your signing key, you will never be able to publish updates to your app on Google Play, ever. Not Google, not Apple, not us — nobody can recover it for you. If it's lost, your only option would be to publish a brand-new app under a different name.
Once you've generated your key:
- Back it up immediately — save copies to at least two safe places (an encrypted external drive, a password manager, a private cloud folder). One backup is not enough.
- Write down the passwords you used and store them alongside the key file.
- Never share the file or its passwords with anyone.
Step 1 — Open the Signing key page
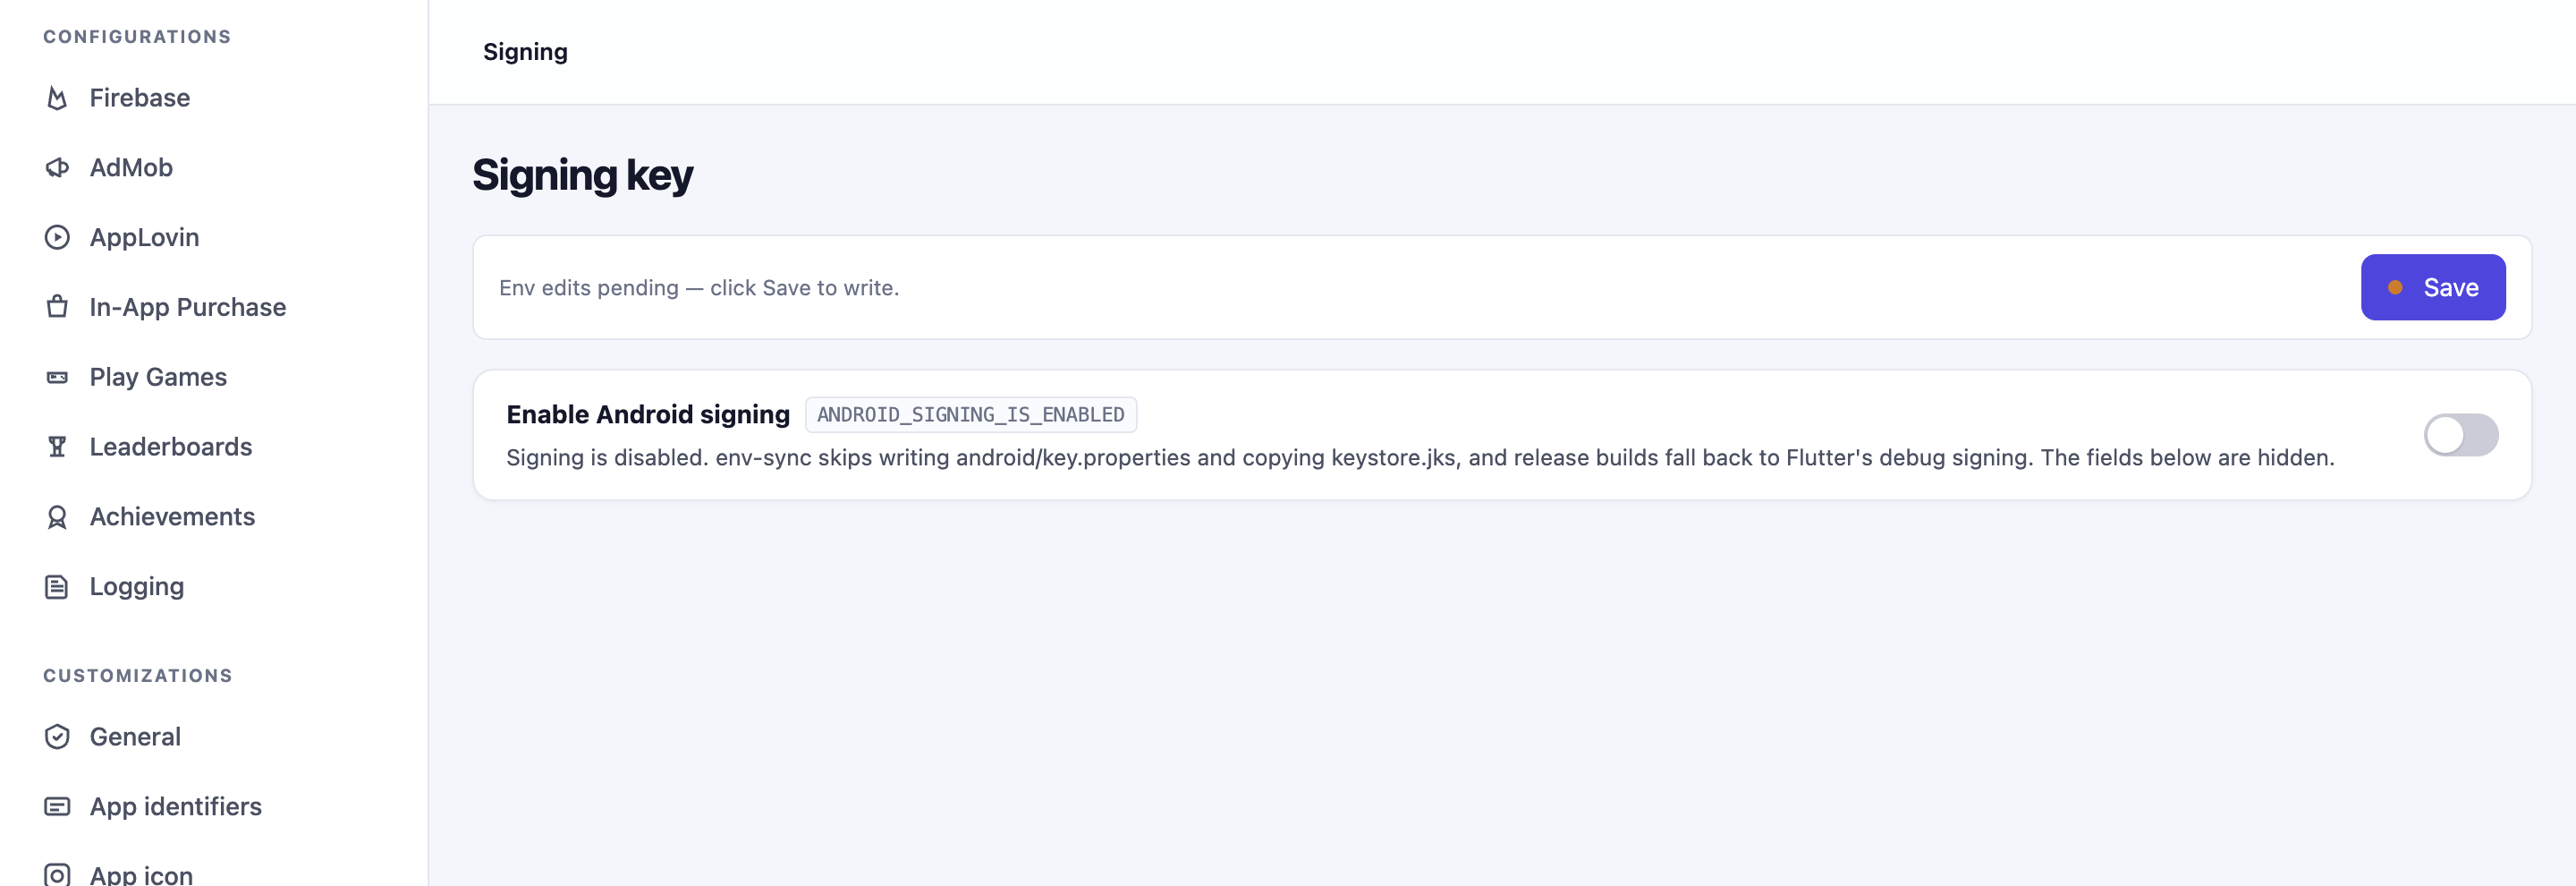
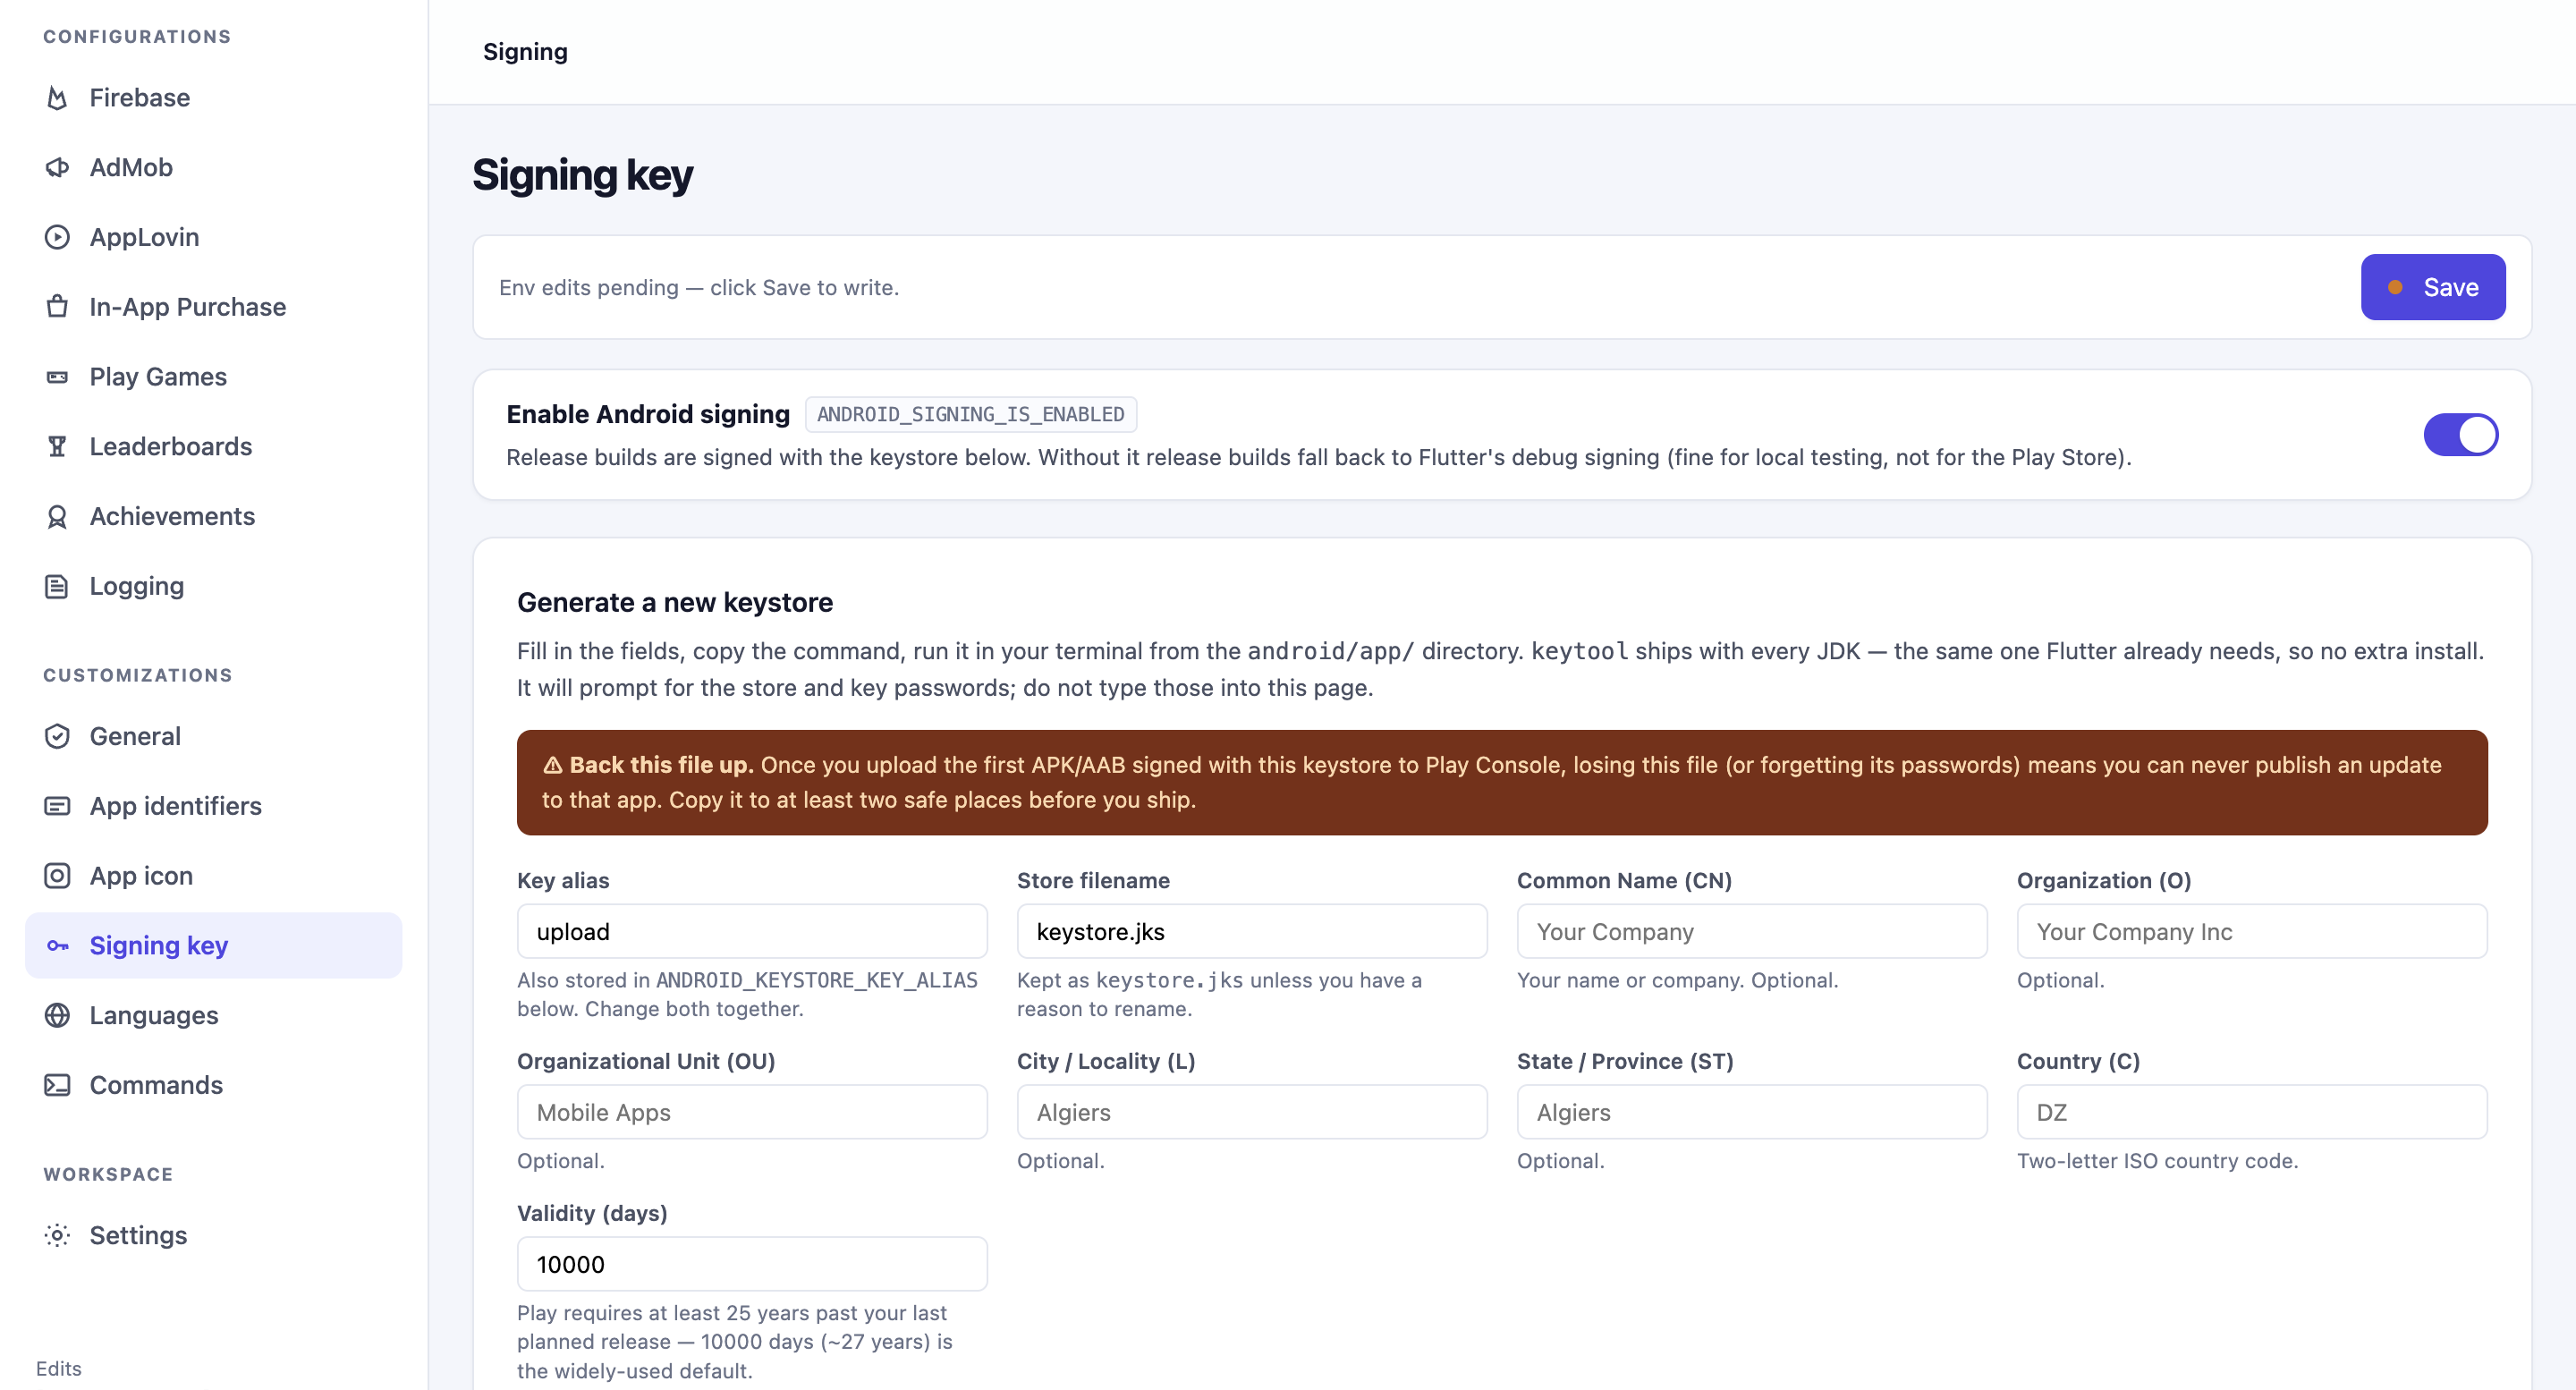
Open the Setup Page in your browser and go to the Signing key section from the sidebar. Turn on Enable Android signing at the top.
Step 2 — Fill in the "Generate a new keystore" card
The Setup Page will build a keystore-generation command for you as you type. Fill in the fields:
- Key alias — a short label for the key. The default is
uploadand there's no reason to change it. - Store filename — leave as
keystore.jks. - Common Name (CN) — your name or company name.
- Organization (O) — your company name.
- Organizational Unit (OU) — a department or product line, e.g. "Mobile Apps".
- City / Locality (L) — the city you're based in.
- State / Province (ST) — the state or province.
- Country (C) — a two-letter country code (e.g.
US,FR,DZ). - Validity (days) — how many days the key remains valid. Leave as
10000(about 27 years). Google Play requires a validity of at least 25 years past your last planned release.
All the identity fields (CN, O, OU, L, ST, C) are optional and are baked into the key for record-keeping only. They don't have to be your legal identity, but the country code does show up on Google Play, so pick that one accurately.
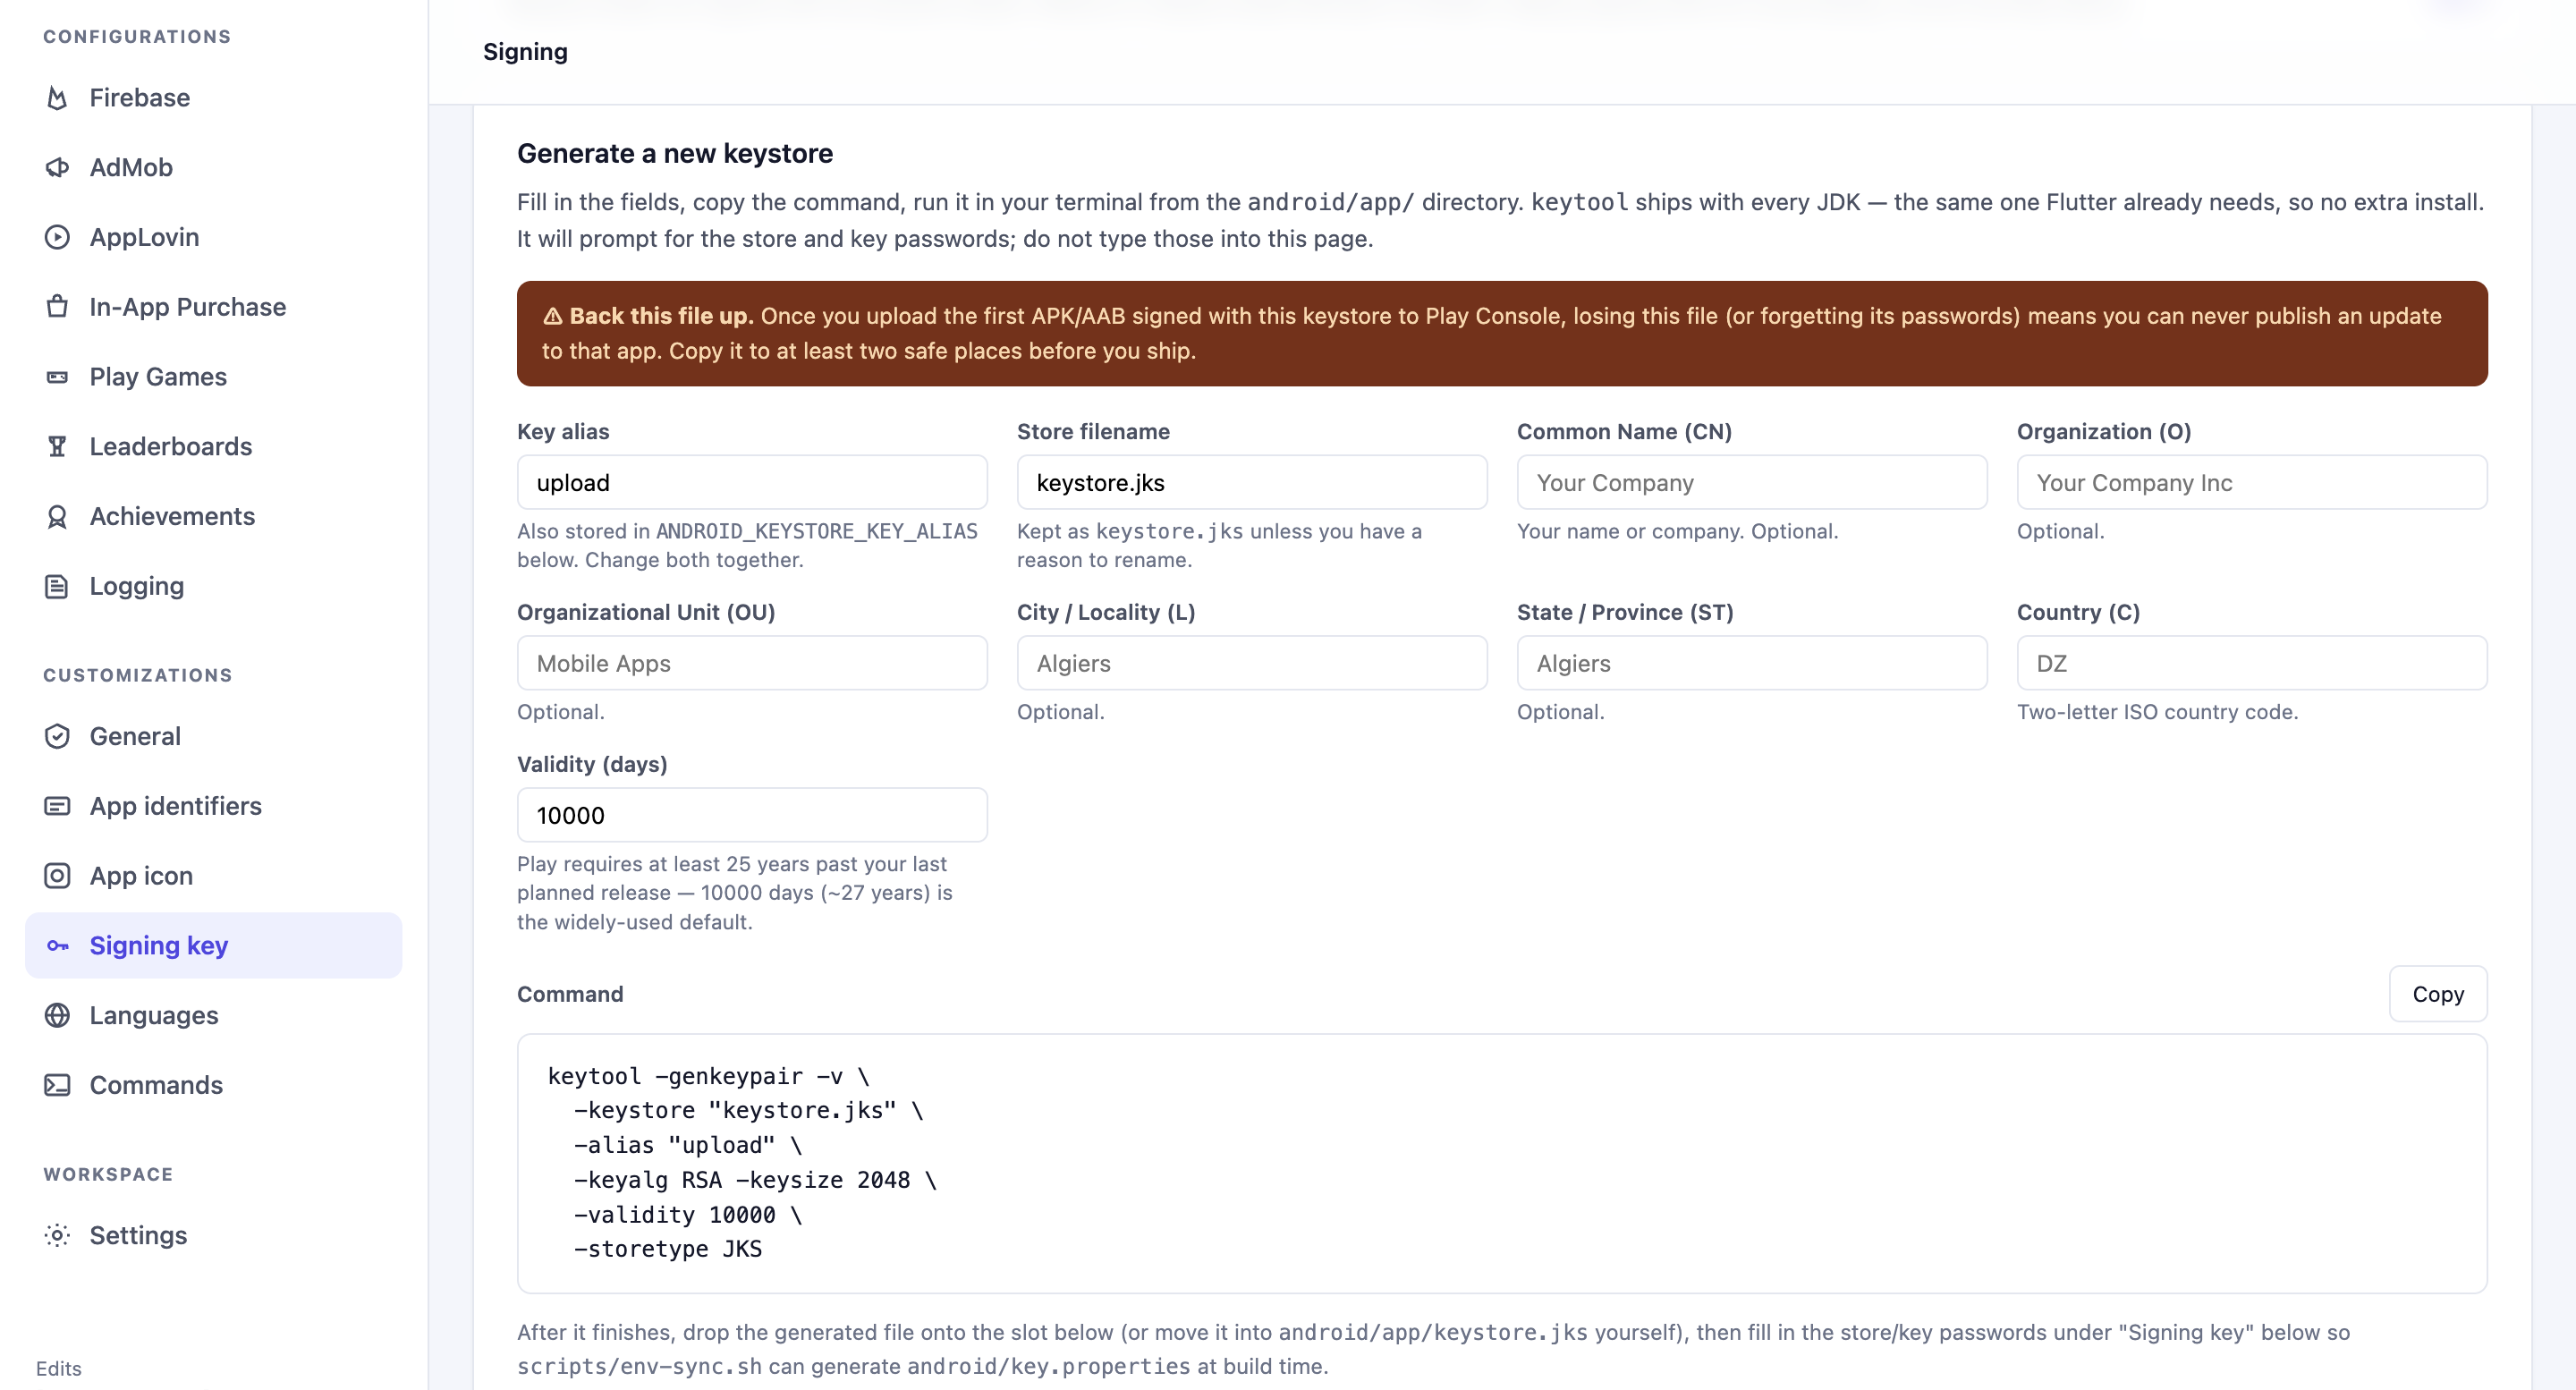
As you fill in the fields, the Command box at the bottom of the card updates automatically.
Step 3 — Run the command in a terminal
- Click the Copy button next to the Command box.
- Open a terminal and navigate into the
android/app/folder inside your project:bashcd path/to/your/project/android/app - Paste the command and press Enter.
The command will then ask you, in the terminal, to:
- Set a keystore password — pick a strong one and write it down.
- Set a key password — you can press Enter to reuse the same password as the keystore. Most people do.
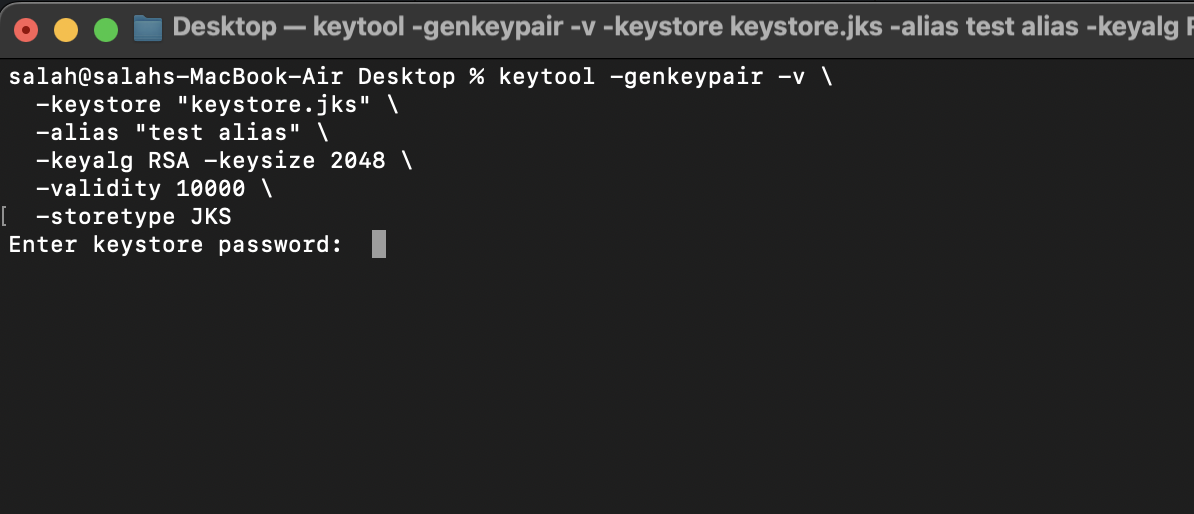
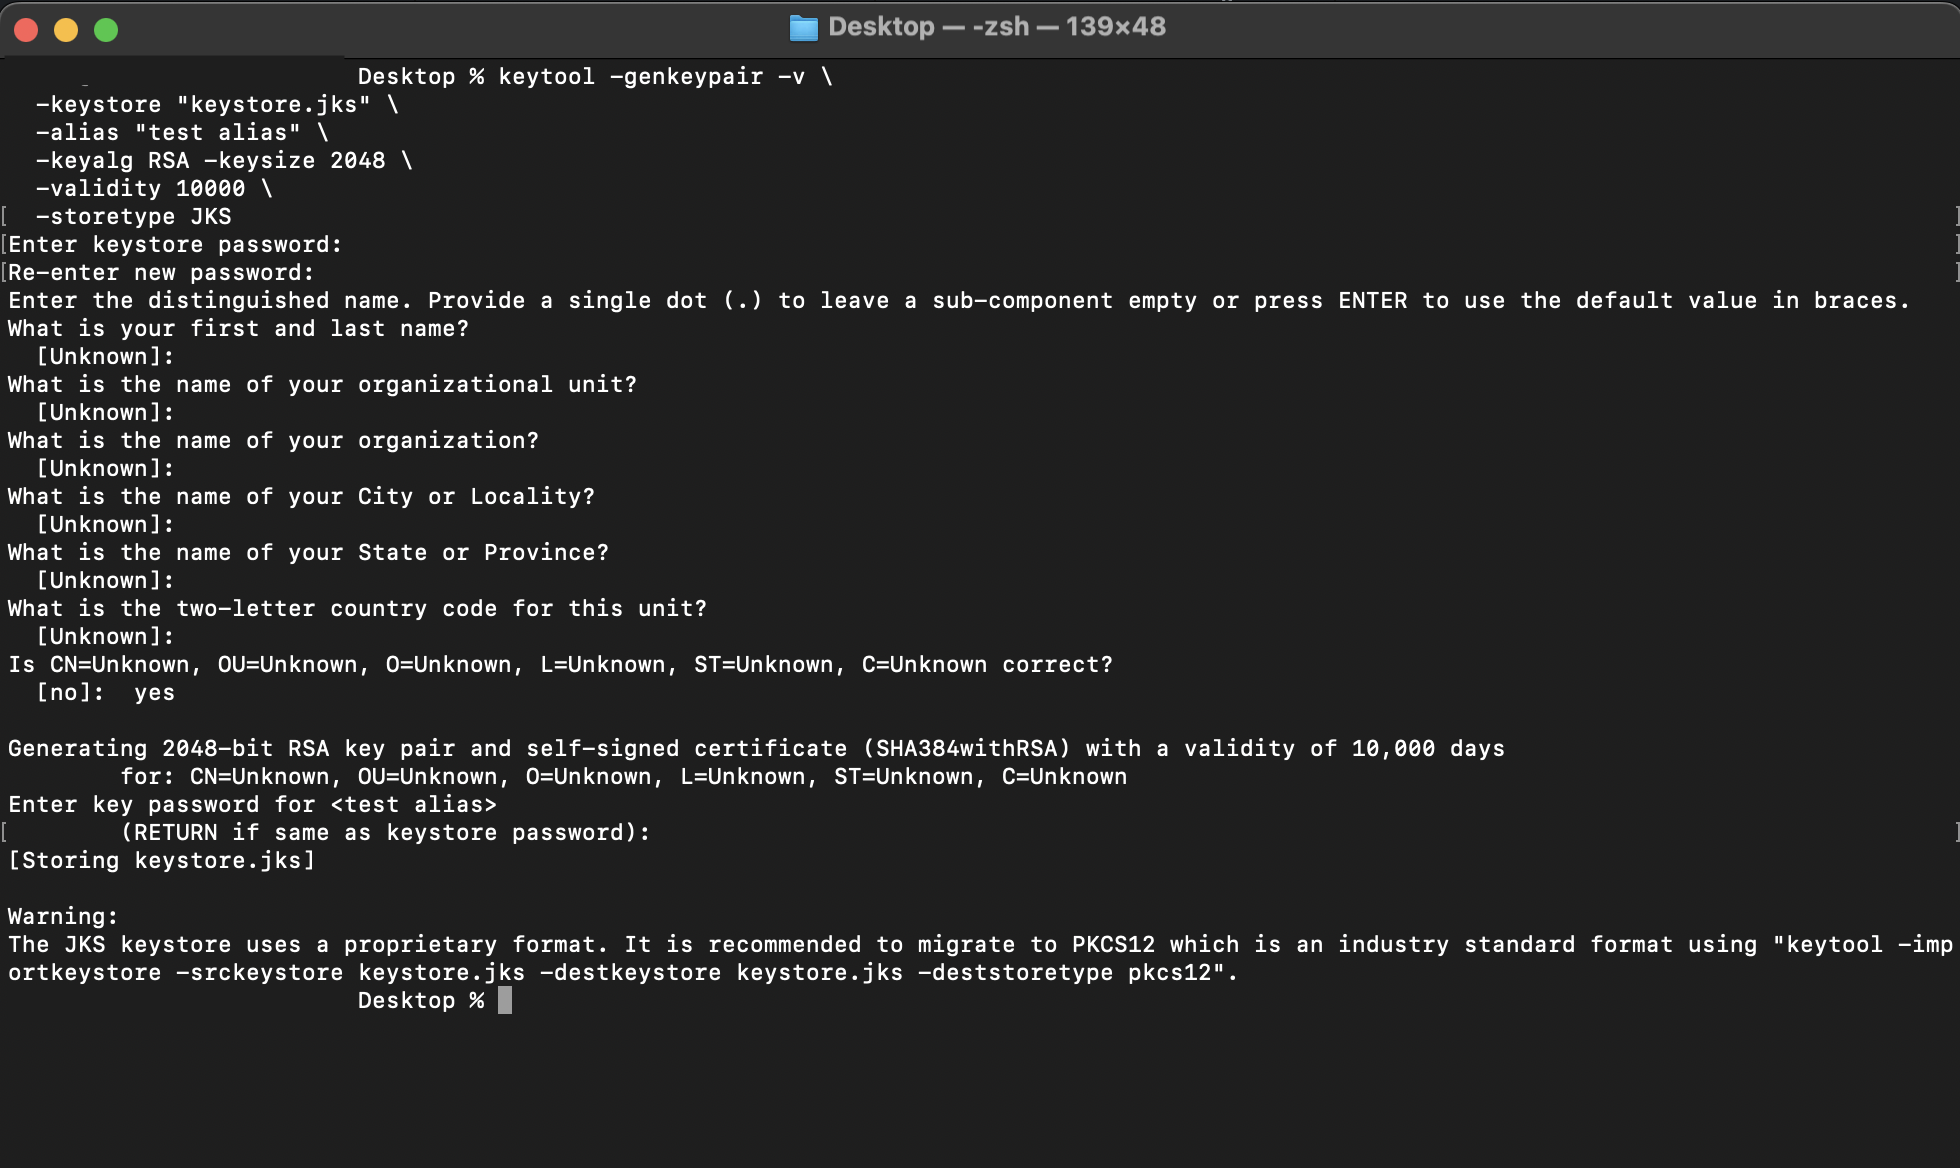
When it finishes, a file called keystore.jks will appear inside android/app/.
Why does the terminal ask for the passwords instead of the Setup Page? For safety. Passwords typed into the browser could leak through your shell's command history or into log files — running
keytooldirectly in the terminal prompts securely and never records them.
Step 4 — Upload the keystore on the Setup Page
Back on the Setup Page, scroll down to the Keystore file card:
- Drag and drop your newly generated
keystore.jksonto the slot, or - Click the slot to open a file picker and select it.
The Setup Page copies your file to the correct place inside the project (android/app/keystore.jks). The card will then show it as Installed.
If you generated the file directly inside
android/app/in Step 3, it's already at the right location — the drop is mainly there for when you move the file back from a backup.
Step 5 — Enter your passwords in the "Signing key" fields
Still on the Signing key page, scroll down to the Signing key section and fill in:
- Store password — the keystore password you set when running the command in the terminal.
- Key password — the key password (usually the same as the store password if you pressed Enter to reuse it).
- Key alias — the same alias you used in Step 2 (
uploadby default).
Click Save.
Step 6 — Run sync
As with every other setup step, run the sync command in your terminal from the project root:
make syncYour app is now ready to be built as a signed release version — see Publishing → Build & Publish.
Back up your key — really, do it now
Before moving on, make two backups of these three things:
- The
keystore.jksfile. - The keystore password.
- The key password (if different from the keystore password).
Save each backup in a different secure location. This is the single most important file in your entire project — treat it like the deed to a house.
FAQ
Frequently asked questions
Where do I get the latest version of the app?
On your CodeCanyon Downloads page, signed in with the account you bought the app with. Updates are free for life — see the Upgrade Code page for the safe way to move to a new version.Do I need a Mac to publish on the App Store?
Yes. Building an iOS `.ipa` file requires Xcode, which only runs on macOS. Android builds work on any operating system.Why don't in-app purchases work when I install the APK on my phone?
In-app purchases, Play Games and other Google Play services only unlock when the build is uploaded to a Play Console track (Internal testing is the fastest) and installed via the Play Store on a device signed in as a tester.Do you provide the source code?
Yes — every CodeCanyon purchase includes the full Flutter source code plus all assets, so you can customise anything.Can I use the same license for two different apps?
No. Envato's Regular License covers a single end product. If you want to publish a second app based on the same template, buy a second license on CodeCanyon.How long does store review take?
Google Play: a few days for the very first submission, then a few hours to a day for updates. Apple App Store: usually 24–48 hours per submission.